“Can you hear me now?” // Radio Overview

I’ll be upfront that by explaining my radio setup my intention is not to debate brands, or certain types of radios. Rather it’s an explanation for what I use, and why I think radios are one of the most critical components for off-roading. They’re a piece of the communications puzzle, they don’t replace cellular phones, satellite transceivers, pagers, carrier pigeons, or smoke signals. Over the course of 5 years I’ve figured out what works best for me, and admittedly that’s not always what works best for everyone.
Keeping that in mind, I have two major circumstances in which I use radios; for general use in the United States while in the backcountry or road trips, or when I’m in Baja. My two radios are Ham, and high power VHF, each with a certain amount of overlap, but for completely different scenarios.

Yaesu FTM-400XDR Ham Radio with it’s touch screen display, and Kenwood TK790H VHF Race/Chase Radio.
To make sense of why I have two radios is to first understand those two different use cases. Ham is an extremely versatile dual-band radio (2m/70cm) radio, that transmits at 50 watts, and has the ability to use repeaters. Repeaters in short are powerful base stations that you can dial into using a lower power radio, and amplify your signal out. This allows handheld or mobile radios (aka mounted in a vehicle) to speak much further than simply radio to radio, which is referred to as ‘simplex.’ With simplex the power of the radio becomes much more critical. With a repeater you can talk potentially hundreds of miles, rather than at best 15-20 miles via simplex, depending on line of sight.
Ham radios are typically compact, they do a variety functions such as the ability to transmit text data, do GPS tracking that can be shared globally, and generally have a lot of bells and whistles. I use the Yaesu FTM-400XDR, a Ham radio that 4-5 years on still hasn’t been supplanted as one of the geekiest looking Ham radios with it’s touch screen color display. I’ll be honest in saying that screen can be both super cool looking, and absurdly distracting depending on the circumstances (especially at night).

Yaesu FTM-400XDR mounted in my previous vehicle (Toyota 4Runner).
When I’m driving around the country the Ham is a fantastic radio, it’s powerful enough to hit any good repeater within a reasonable distance, and it works more than fine in a smaller group of vehicles even in simplex. But 50 watts shows its limitation if the situation calls for pure punch/distance via simplex. So in comes my Kenwood TK790H, which was refurbished by PCI Race Radios, and programmed by my good friend Ken Neal of Bullet Proof Diesel (more on his company in a bit). The Kenwood is a VHF, 110w race/chase radio that kicks out an absurd amount of power. It’s simple, easy to work with, but pretty barren feature wise. This isn’t a negative. In Baja its got only so many buttons, two dials, and a hand mic so burly you could use it to fight off an attacking animal.
Both radios play in similar frequency bands, the Ham being 108-174mhz and 400-480mhz for receive, and 144-148 and 430-450mhz transmit by default. While the VHF radio operates between 148-174mhz for both receive and transmit. The Ham radio however has some restrictions by default for FCC reasons, which create a situation where the Ham can listen to many of the frequencies required for Baja race teams, but unable to transmit.
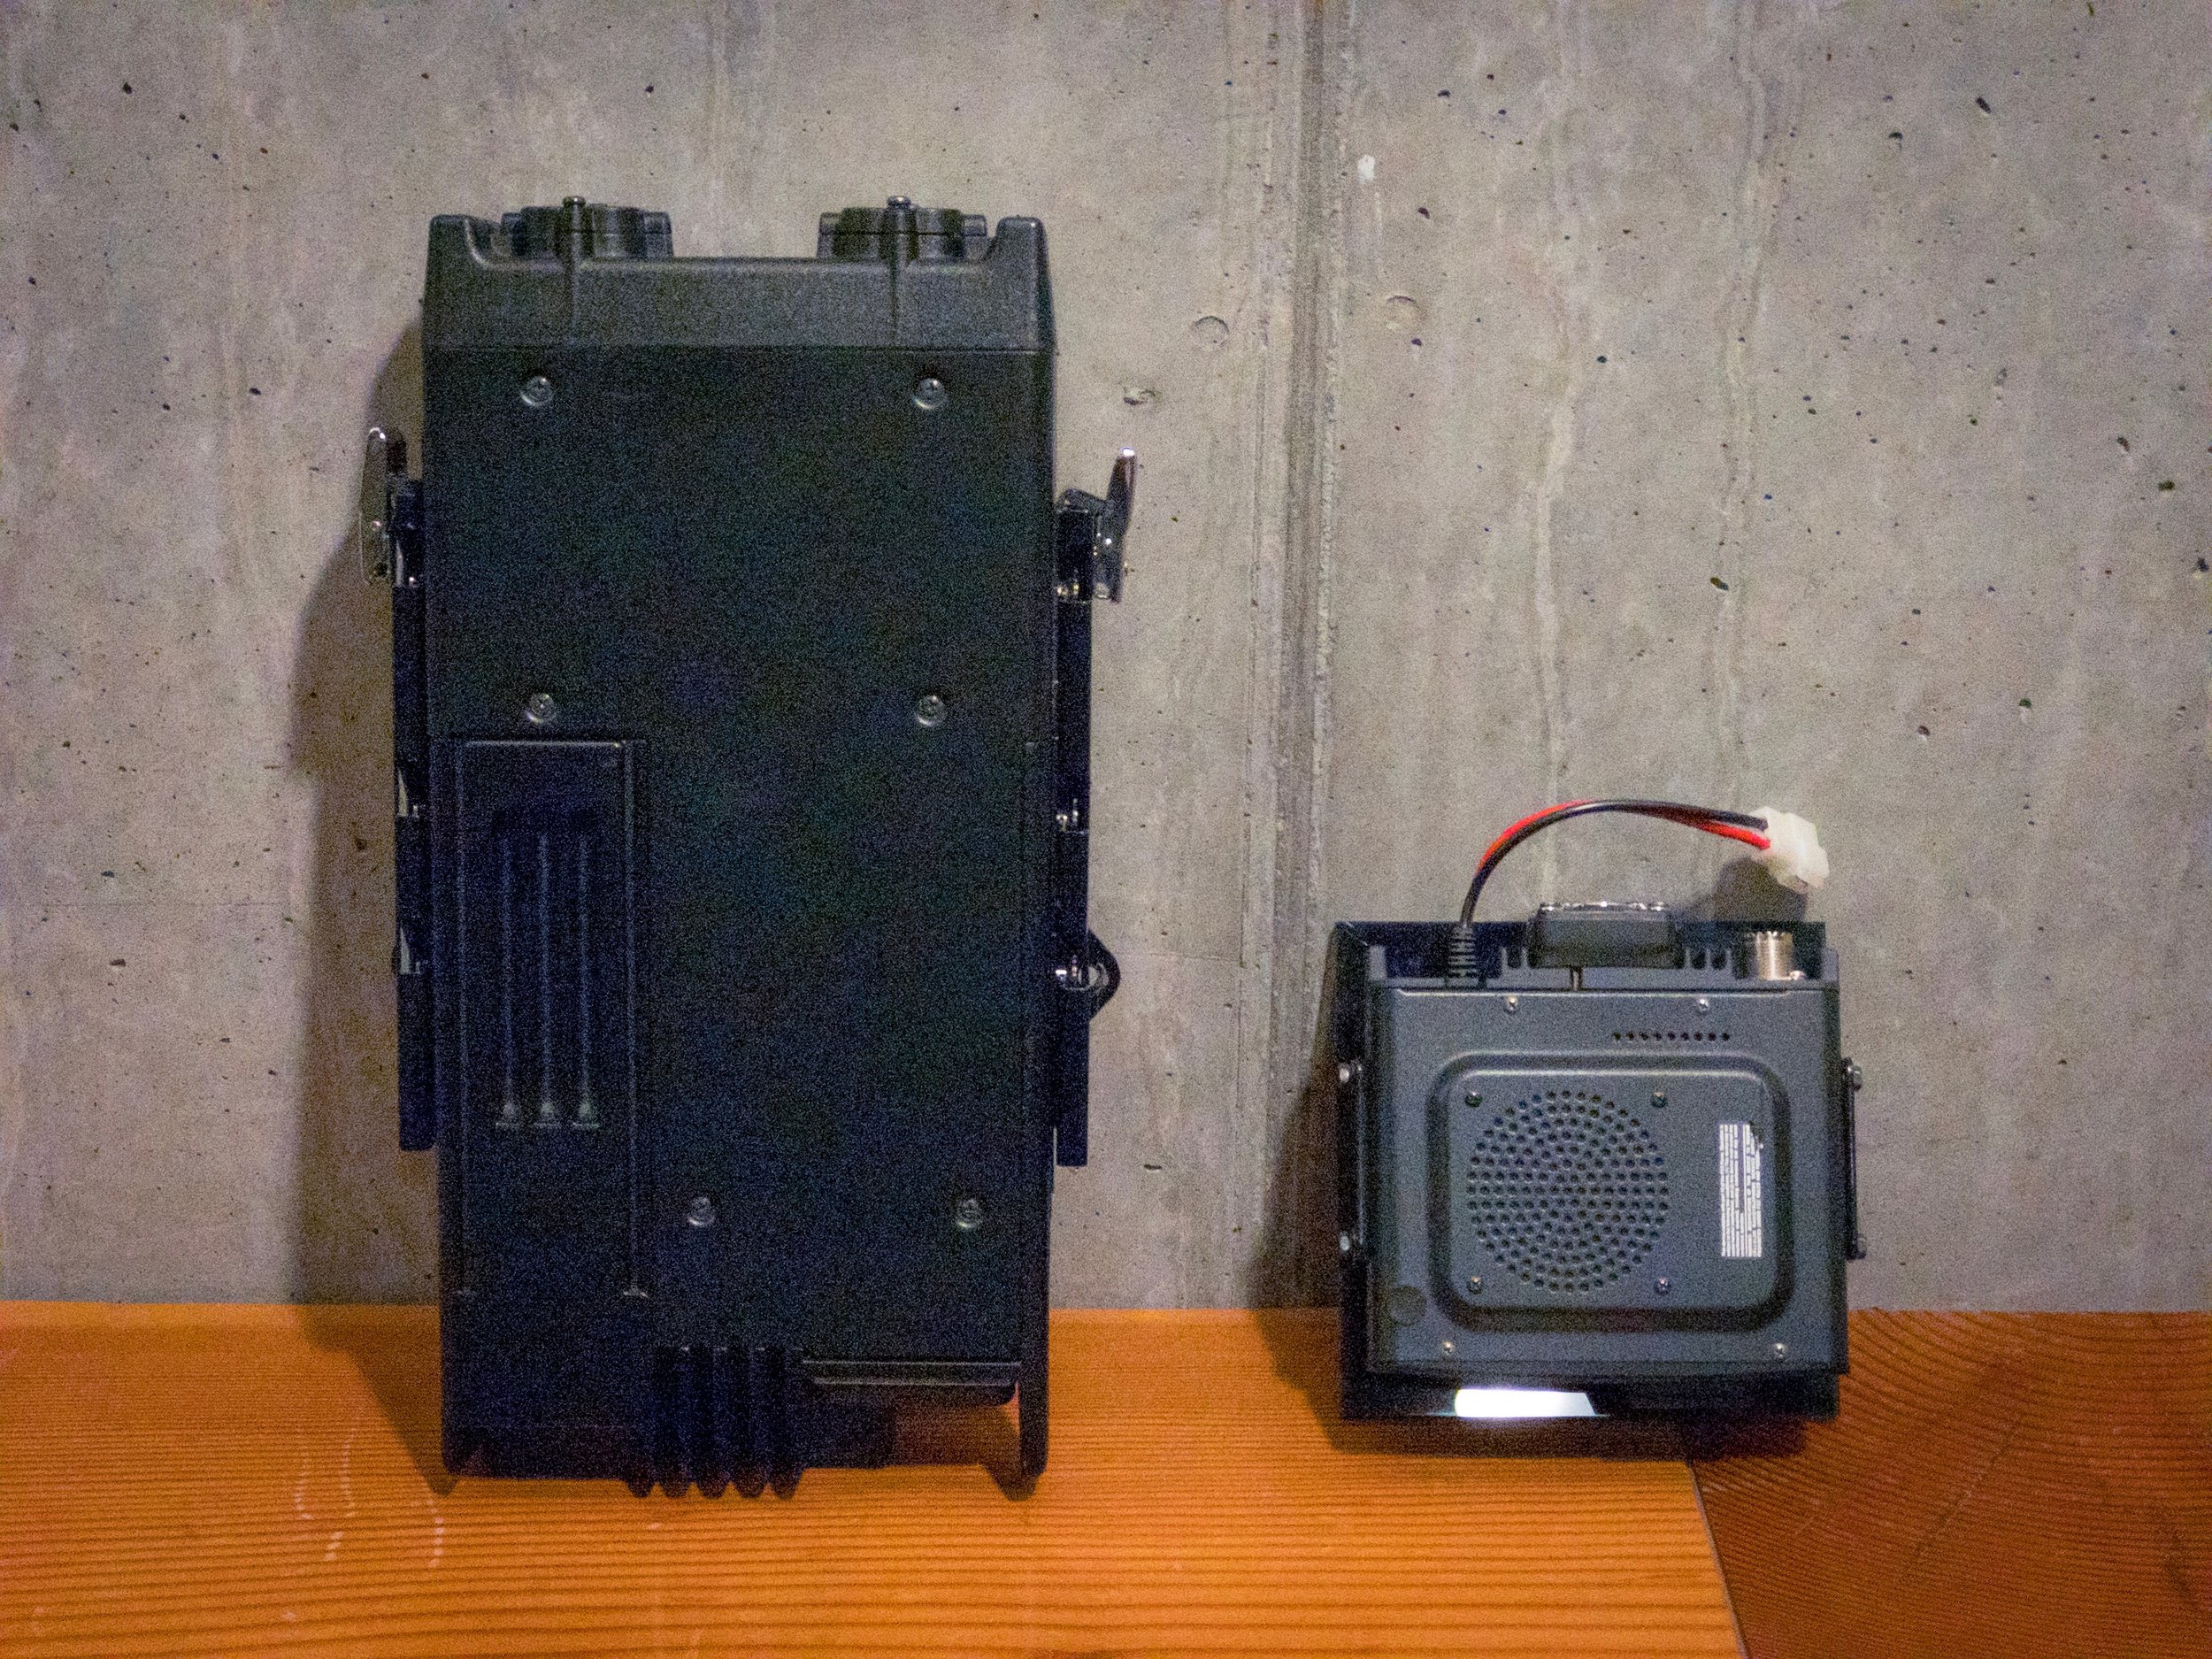
Size comparison between the base units of the Kenwood VHF radio, and Yaesu Ham radio, respectively.
My Yaesu has the MARS/CAP mod performed to it that removes those aforementioned frequency restrictions for which parts of its operational bands can be transmitted on. Before we go any further I need to be very clear that this is done at your own risk, both to you as a Ham operator and to the equipment. Warranties are usually rendered null and void, and many first responders operate on the frequencies that Ham radios can normally listen on, but would normally be blocked from being transmitting on by these amateur radios. This means if you are not careful, you have the ability to not only listen in on frequencies usually used by first responders, but you could accidentally key your mic and disrupt these same critical organizations. This would be bad. If you’ve gone through the process of getting your Ham license (which you should), you know the responsibilities that come with these radios.
A Ham license will take you about a day to study for, and 15 dollars, and you’ll then be licensed for 10 years. You’ll be assigned a unique callsign, and be able to freely use the frequencies that your level of license allows you on. Why get a license? Because all of these frequencies are shared, and interfering on radio channels can be both annoying and dangerous to others. A license means you understand the rules of the radio roads. It’s cheap, doesn’t take long to obtain, and it’s the right way to use this equipment.
So with that out of the way, for Baja, both radios can talk to the same frequencies (around the 150mhz range in the case of Trail of Missions). What I’ve found from experience is that while the Ham radio has no issue receiving communications in a long convoy, it lacks the punch to reach either all the way from the front to the back (or visa versa), or from the middle to the opposite ends. I can hear just fine, but my communication comes in rather weak (if at all). Dealing with dusty Baja roads, convoys can stretch out upwards of 20 miles, through extremely varied terrain, where line of sight is limited. Ham is fantastic in the States, but only marginally successful in Baja California for the kind of driving I do.

Headunit of the Kenwood TK790H. Simple, no frills, but durable.
The Kenwood VHF radio is absolutely pure power and punch. It’s not able to talk to repeaters. It has a pretty no frills LCD display right out of the 80’s, it’s clunky, but it’s meant to be durable enough for race trucks, and stupid simple so that first responders can use while focusing on more pressing matters. If you’re looking for a cheaper Kenwood you can find most of them pulled out of old medical vehicles or police cars. These radios are still in use today, but many of them are retired as first responder vehicles are decommissioned.
The biggest difference between each radio, besides power output, is how you’ll interact with it. If you’ve used a Ham radio you’ll know you can program in preset frequencies, or have the ability to free spin the dial and tune the frequencies increment by increment. The Kenwood doesn’t do that. You preprogram anywhere from 1 to 160 channel via a PC laptop, and that’s it. Want to program in something in the field? I hope you brought your laptop and programming cable! Due to the power of the radio, it’s regulated by FCC guidelines to operate on pre-assigned channels. For trips like Trail of Missions, realistically I’m on two frequencies: Weatherman, and Desert Assasssins 01. Suffice it to say the VHF radio is specialized in design and application, and it’s not the radio you’ll bring along for cross country road trips.

Coffee cup for scale. When I mentioned this radio is big, I was not overstating the truth.
So that’s the situational, and specs, differences between the radio types. How are they set up in my vehicle? First off, you have to power your radios. That doesn’t mean these plug into your 12v cigarette port. In the case of the Kenwood you’re pulling a pretty hefty amperage on transmit. The Ham is usually about 10amps, and the Kenwood just shy of 25amps. Because of this, these radios need to pull their power directly from the vehicle’s battery. In my situation this meant running from power from the battery, through a 140amp Blue Sea breaker mounted in the engine bay, through the vehicle’s firewall, and mounting to a Blue Sea fuse panel mounted under the rear driver-side seat. From there each radio was independently fused. I’ve never blown a radio fuse in 5 years, but having quick access to your electrical is always a smart idea.

Diagram showing general routing of systems.
My Yaesu Ham radio mounts on a prototype BuiltRight Industries panel, that hard mounts the radio body to the the floor and keeps all wiring tidy and accessible in case of maintenance or repairs. The FTM-400XDR uses a separate control head that I have mounted near my center console. The control head sits attached to a RAM Mount “RAM A Can” cupholder mount. Considering the Ford Raptor has like…2 dozen cupholders, sacrificing one wasn’t a big deal. The Yaesu has a separate mic cable that I run under the floor, terminating in an extension port next to my right leg. I keep the microphone within close reach, since most of the time I’m using the Ham radio by myself. In Baja my co-driver is the one usually responsible for working the radio, though the radio is still usable just by leaning over to the passenger side of the center console.

Prototype BuiltRight Industries™ panel. Note: Coax selector on the right, with Yeasu Ham radio and Blue Sea fuse panel on the left.
With the Kenwood TK790H, mounted behind the passenger seat on another BuiltRight Industries panel, the radio body sits out of sight with its control head mounted above the glove box. While I enjoy the fact that I can remove the Yaesu’s color display by simply unplugging it (if I’m leaving the vehicle unattended for long periods of time, and don’t want to tempt thieves), the Kenwood’s control head is pretty substantial and has to be hard mounted. Since I don’t use two radios at once, I figured i could simply undue the RAM mount, and put the Kenwood’s head on the cupholder mount. This idea lasted all of an hour, as the weight caused it to keel over. If it couldn’t survive a trip around town, it couldn’t make through 5 minutes of Baja. In the end, I was forced into hard mounting the control face into a cubby that sits above the glove box on the current Ford F150, and using a Magnetic Mic mount to hold the previously mentioned, and extremely substantial, hand mic to the trim panel adjacent to the VHF radio.

Kenwood head unit hard mounted into the cubby above the glove box on my 2018 Ford Raptor SuperCrew.
This magnetic attachment for the microphone is incredibly stout, and super simple to use. A steel puck is attached at the back of the hand mic, while a rare earth magnet is hard mounted to the vehicle trim. I use the same setup for both the mic of the Ham, and for the Kenwood VHF radio. In my previous vehicle, the interior trim used fairly weak attachment clips, and the magnetic mic was prone to literally pulling parts of the vehicle interior apart before the hand mic itself would let go.

Magnetic Mic attachments pictured.
Each radio has its own speaker. The Ham uses a smaller speaker mounted under the driver seat, that can move forward and back with the driver’s adjustments. While the Kenwood’s speaker is mounted under the rear seat on a storage box, so that both driver and passenger can hear communications easily. One eventual goal would be to consolidate speakers and just rely on the rear most speaker that would be bi-wired into both radios, since only one radio is used at a time.

ICOM stereo speaker mounted via industrial grade velcro to the bottom of the driver seat. This allows the speaker to move forward and back.
That covers the inside of the vehicle, but a radio is pointless if you can’t transmit a signal outside of the vehicle. One of the best features of how I’ve set up my Ford Raptor is by using a Bullet Proof Diesel third brake light mount. This easily integrates two NMO mounts between the aluminum body of the truck, and the third brake light itself. As a result I’m able to feed two coax cables with PL259 connectors into the back of the cab. Since I run a WeBoost cellular booster for my truck, one of the NMO connectors (passenger side) is dedicated to that device’s antenna. While the driver’s side NMO connector plugs into a coax radio splitter box. This Y junction allows each radio access to the same NMO port, and all that’s required to do so is simply selecting which radio gets use of that connector. Because each radio uses it’s own unique antenna, it’s a case of deciding which radio I’ll use on that trip, selecting that port, and then attaching the correct antenna. Given that the height of my garage precludes me from leaving an antenna installed, it’s fairly difficult to mix antennas up.

Bullet Proof Diesel dual third brake radio mount. Ham/VHF NMO mount on the left, and WeBoost/Cell Booster mounted on the right.
Okay, so what does all this cost? For a quality mobile Ham radio you can expect between 200-500 dollars, depending on the bells and whistles. My FTM-400XDR ran me about 400 dollars during Ham Radio Outlet’s spring/summer sale. Factor in a microphone extension cable, antenna (I’ve owned about 6 antennas looking for the right one), and external speaker, and there’s another 200 dollars. My Kenwood TK790H was an eBay purchase at about 250 dollars used, but ran me closer to 600 dollars once I completed some repairs, replaced a funky microphone cable, and procured an external speaker and proper antenna. The Kenwood was worth the legwork as these can cost 1000 dollars new, but if you’re looking for a turn key solution on a VHF race/chase radio PCI Race Radios is the company to contact.
I’m a strong proponent of also having a handheld radio, but would just as strongly suggest that this is not be your primary radio. The structure of a vehicle is designed in such a way that most of the radio signals are absorbed or deflected by design. This applies to transmitting and receiving, and while an external magnetic mount helps bypass this issue, you’re still only transmitting at 5-8 watts at most. A handheld radio however is a good tool to have as a backup for other people in the convoy should they not have a radio. A radio is better than NO radio. However even if you have a good mobile Ham, having a handheld allows you to help be a spotter while outside the vehicle for other vehicles. This keeps communication clear and concise in situations where providing information to a driver can mean the world of difference in difficult terrain.

To that end I believe 50 watts should be the minimum for your primary mobile (vehicle mounted) radio. I do not advocate running out to install a high power 110watt VHF radio if the vast majority of the communications you do does not involve a convoy of radios all running the same type of radio. While the output power is fantastic, the versatility of a VHF radio is pretty limited. The best comparison I can make is that a Ham radio is a carpentry hammer; versatile, and easy to use. While a high power VHF radio is akin to a sledgehammer; powerful, but limited in its application.
My design thinking has always been to integrate gear into a vehicle in a way that feels clean, simple, and easy to use. It’s fairly easy to go overboard and end up with a dashboard that is cluttered, full of blinking, beeping, and distracting screens. Communication is a key function of most off-roading in a convoy, or navigating the backcountry, and however you choose to build your radio setups keep simplicity in mind. Always select your gear based not on the amount of bells and whistles, but go with proven brands. Avoid re-branded Chinese radios, and opt for solid and proven performers. A radio can at times feel like a toy for most, but it can be an absolute life line on occasion. My radios have bailed me out big time before, and to that end as nerdy as some of these setups can be, they’ve paid for themselves many times over.